Viewing the Invoice and Accessing the File


Viewing the Invoice and Accessing the File |
|
|
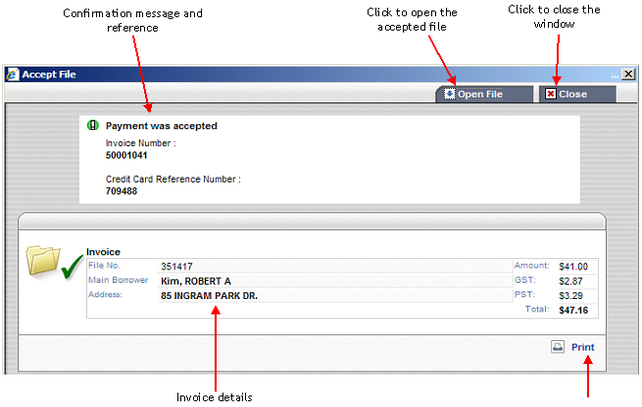
Viewing the invoice and the confirmation of the payment is the last step in the file acceptance process. In the previous steps, you have accepted the Assyst Real Estate Usage Agreement and confirm the payment of the inherent charges. In this last step, you You (lawyer/notary and assistants and other lawyers/notaries who have been delegated this right) will be able to consult and print the final invoice. ➢To accept a new file – Viewing Invoice step After accepting the payment, a new window is displayed with the final invoice. The invoice includes the following information: TELUS file number, name of the main borrower and property address and the amount to be paid including taxes. Note: For users in British Columbia who are connected to Assyst Real Estate through BC online, the payment section will display their BC Online account number that will be used for paying the charges. Note: A soft copy of the invoice is automatically generated and kept in the list of documents available for this new file (see the Documents tab). In this final Accept File window, a message is displayed on top to confirm that the payment has been processed and to give you a reference number.
1.You can print a copy of the invoice by clicking the Print link at the bottom right side of the window. This will display the Windows Print window. Click the Print button to start printing. 2.Click the Open File button to open the new accepted file and consult the information. This will close the Accept File window. The new file is displayed. You can now edit it and start processing it. Note: In case of file sharing, if the Access files permission has not been granted, the Open File option is not available. The new accepted file is transferred from the list of new files to the list of your current files under the name of the financial institution which has assigned this new file to you (and under the name of the lawyer/notary responsible for it in case of file sharing and if you have the right to modify the current files). Note: You can generate at any time the transaction report to view the transaction that has been completed. For more details on the transaction reports, refer to the Working with Transaction Reports section. |